Greg’s Ramblings “Brew In A Bag” by Greg Hackenberg
So apparently, Hank has not run out of things to say. However he did prod me once more to contribute to the HopLine under whatever title Monk deems to apply to my zymurgistic ramblings. This time he did give me a suggestion, so no need to dip into the stash of beer and spin (that’s an old term you kids probably won’t understand, unless you’ve seen a “record player” or some sort of demonstration in a museum somewhere) some Miles Davis again. Is it me or was it hard not to watch the Atlantic record label spin round and round on Led Zeppelin IV even when you weren’t stoned? Okay, now I’ve got to listen to “Four Sticks” one of the greatest examples of rock drumming evah…again, I digress.
So say you’ve got something wild in mind that is going to take a few tries to perfect. Maybe you just want to throw together some leftovers into an impromptu beer but are limited on time. Or you’ve got the idea that a series of beer, perhaps changing out the base grain or with different hops. In any event you don’t want to commit to a full batch of 5 or 10 gallons.
Now I’ve been whipping out 3 gallon trial batches of beer, including a nice run of single hopped California Common (it is a great way to get to know a hop from top to bottom). Okay, you must be thinking “3 gallons!? That’s a lot of work for not so much beer.” Well, you’d be right, if I was doing my typical Gott cooler mash tun, false bottom fly-sparge to the keggle. Back in the day…I have enough gray hair to say that…it was just called sparging. No batch in those days. Current research indicated the Scots came up with the sparging first; trickling hot liquor over a static grain bed to extract everything possible… “I paid good mony fer that grain, I be gettin eve’r droop of sugr ootta ther!”…Makes sense. Nowadays besides “fly” we have batch and a new spin courtesy of our friends down under…BIAB: brew in a bag.
You may have run across it mentioned in forums, magazines, or you may reside under a comfortable rock. I suppose, seeing that it violates two of Homer Simpson’s pieces of advice “That’s the way we’ve always done it” and “It was like that when I got here,” that you chose to completely ignore it. Okay, I get it, and that’s why Hank buttonholed me again and suggested I write up a little process I’ve been using, because I’ll try out this stuff so you don’t have to. And besides, now I’m listening to the rest of Zepp 4 with a nice porter, as well you should, and figure I’ll just fill you all in.
Three gallons of beer, one five gallon canning pot (had it for years), a vegetable steamer (advice: buy you own steamer, do not use the one from the kitchen) and a five gallon paint strainer bag courtesy of the paint department of Lowes, Home Despot, Helm Paint or wherever you choose to purchase them and washed beforehand. All set up on the typical propane burner, but this could work on a decent gas stove as well.

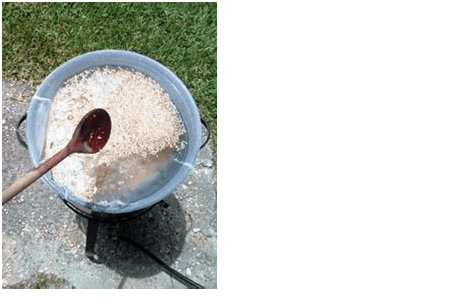
That’s what I use. Larger setups are possible with a dedicated nylon mesh bag for full five gallon batches. This set up accommodates 4-6 lbs of grain and has just enough room for four gallons of water, netting a three gallon yield. Overall I’ve been getting 75-76% efficiency consistently with no sparging of any kind.
Now here is the kicker: with the brew-in-bag method, all the water: strike, sparge, top off, passing rainstorm, is placed in the pot along with the grain and mashed. What passes for sparging is simply lifting the bag with the grain in it out of the pot when you’re done. Thank the Aussies for this one. There were bits of it floating around. David Line, the British enthusiast who published perhaps what was the first modern treatise on Homebrewing in the late 70’s The Big Book Of Brewing, wrote of a bag with perforated bottom instead of a false bottom or manifold. But the Australians figured it out and it is the dominant method of brewing down under.
So here it is, the water was added and heated to the proper strike temp, and the grain dumped in. For this pot, I typically round it off to 16 quarts; that leaves just enough space for 4-6 lbs of grain without slopping it all over the place. With the large volume to grist ration, strike temp is only 3-4 degrees hotter than the target mash temp. I use BeerSmith, set for a 5 gallon brew pot and it pretty well nails it. Doughing in is a snap with all that liquid.
Now I let it mash for an hour. I use a sophisticated insulation method of wrapping an old beach towel around the pot. I stir and check the mash temp every fifteen minutes or so. I will usually add a few seconds of heat 2-3 times in the course of the mash. Important safety tip: take the towel off when the burner is on. At this point anyone who remembers the stovetop temperature mash method where direct heat can be applied to the mash will see the similarities. And that ability to heat it allows you to perform the next step, which I think is critical; a mash out. I heat the grist up to 168 and hold it for five to ten minutes stirring a few times to make sure everything is heated up, loose and flowing.


Now comes the “sparge” part. Detach the neck of the bag and lift up the “tea bag”. I will let it drain a minute or two and dunk it back in. I gently shake it to loosen the grains and get them saturated again, and then lift it out again. I dunk it two or three times, letting it drain to drips after the last dunk. No squeezing is employed. That’s it, mash and sparge is done. Now think of how much time you just saved.
So I set the bag in the lid of the pot, fish out the vegetable strainer with my charismatic wooden brewing spoon seen earlier, and turn on the flame to start the boil. While it’s heating, I’ll press on the bag with the back of the spoon to collect another cup or two of liquor that drains out of the bag. I’ll add this to the pot, but again, I do not do any real squeezing.
From there you should know what to do. Boil, add hops, cool and pour into the fermentor as with any batch of beer. For the boil, I’ve notched my spoon so I know when I’ve gotten down to three gallons. I will adjust the heat and top off as necessary to hit the three gallon mark. And for topping off, you can dunk that bag in more water to extract a little more and add it as needed. But, like I said, I’m constantly around 75% efficiency.
