Hank Speaks… So Listen
by Hank Bienert

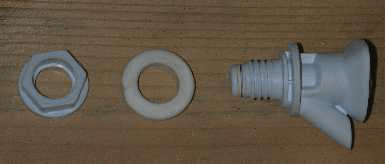
Start with your basic 10-gallon Rubbermaid or Gott cooler (mine is a Rubbermaid, purchased rather expensively at a restaurant supply.) I ran the wort line out the spigot hole at the bottom, like everyone else. You have to remove the spigot. The spigot is held on with a large plastic nut on the inside, and a rubber gasket.
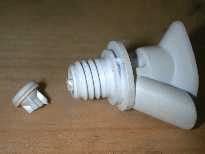
Here’s where my method departs from others I’ve seen. Gott has conveniently already solved the bulkhead problem with this spigot. Perhaps we can find a way to leverage their work. Since we were originally just going to throw this part away, we may as well take it apart first (in the interest of science). If you push the spigot button, you can use a sharp knife to cut off the plastic valve that will protrude from the inside of the spigot: The valve core will then fall out the other side.

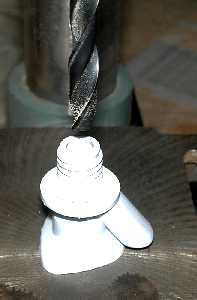
To make this into a bulkhead fitting, we need to run a piece of tubing through the spigot body in a water-tight way. For good flow-rate and resistance to clogging, I used the ubiquitous 3/8″OD copper tubing from Home Depot. The spigot body has a hole straight through it that the core used to be in. The hole is too small for the 3/8″ tubing, but the spigot body has enough material that we can enlarge the hole just enough to get a tight fit. I just used a 3/8″ bit in the drill press:
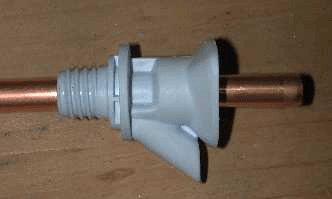
Then you can push the copper tubing through the hole to complete the bulkhead fitting:
At this point, I replaced the spigot on the cooler, with the original rubber gasket and plastic nut. Filled with 10 gallons of water, it was water-tight. Nevertheless, to be extra sure, I applied some food-grade sealant around the joint on the inside.

And that is basically it. No futzing about with poorly-fitting rubber stoppers, no search for some elusive combination of Home Depot pipe-fittings (I wish I could get all that time and effort back now.)
The basic run down can be found at:
http://www.thegatesofdawn.ca/wordpress/homebrewing/mashtun/
